
LPVO · Zeroing Masterclass · Smart Zero AI & Real Ballistics
How to Zero Your LPVO (2026): Smart Zero AI, 50/200 vs 100Y Zeros for AR-15 & AR-10
Most zeroing articles online are written around red dots, not true 1–10× LPVOs. They ignore magnification, ignore reticle geometry, and ignore how different .223/5.56 and .308/7.62×51 behave once you get past 200 yards.
This page takes a different approach. It treats your LPVO the way serious doctrine does: as part of a fire-control system that includes the rifle, the reticle, the ammunition, your environment, and now Smart Zero — Empowered by SWAT Optics AI™.
You will see how to choose and confirm a zero that is grounded in:
- Real AR-15 and AR-10 ballistics
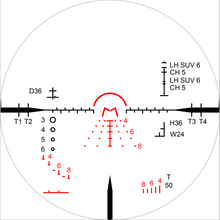
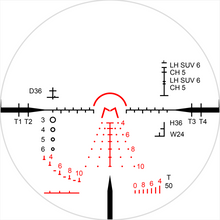
- The geometry of the HSS DMR M-Reticle (W24, H36, CH5, SUV6)
- The SWAT Optics Ballistics Calculator & Tactical Simulator
- The new Smart Zero — Empowered by SWAT Optics AI™ tool
By the end, you will not just “have a zero.” You will have a mission-aligned zero with transparent math behind it, validated on glass and in the simulator.
Step 0: Lock In Your HSS DMR LPVO & Reticle Guide
Get the glass, learn the reticle geometry, then use Smart Zero AI and the Ballistics Calculator to build a data-backed zero.

🎥 Watch the M-Reticle Work Before You Touch the Turrets
Most shooters learn zeros on paper. You will learn zeroing in real geometry — vehicles, windows, HVAC units, streets, and partial exposures. Watch how the M-Reticle behaves in the environments your AR-15 and AR-10 actually live in.
LPVO & Zeroing Knowledge Hub
This zeroing masterclass lives inside a larger HSS DMR training ecosystem. Work outward into these pillars as you refine your data and holds:
- 📚 The LPVO Handbook (2026 Edition) — Complete Guide for AR-15 & AR-10 Shooters
- 🎯 LPVO Mastery Hub 2026 — HSS DMR 1–10× M-Reticle Framework
- 🥇 Best LPVO 2026 — Ultimate Military-Based Guide for AR-15 & AR-10
- 🔎 Best AR-15 LPVO (2026) — Why the HSS DMR 5.56 Leads
- ⚔️ Best AR-10 LPVO (2026) — Doctrine-Driven HSS DMR .308 Setup
- 📘 HSS DMR M-Reticle Field Manual (2026 Edition)
- 📐 HSS DMR Ballistics Calculator & Tactical Simulator
- 🎓 Reticle Academy (2026) — HSS DMR LPVO M-Reticle Training for AR-15 & AR-10
- 🎯 LPVO Zeroing Doctrine (2026) — 50/200 vs 100-Yard Zeros for AR-15 & .308 Carbines
- 🧠 LPVO Resource Center 2026 — HSS DMR 1–10× for AR-15 & AR-10
Before You Touch the Turrets: Hard Zeroing Facts
- 1 MOA ≈ 1.047″ at 100 yards and scales linearly (≈ 10.47″ at 1,000 yards).
- 1 MIL ≈ 3.6″ at 100 yards and ≈ 36″ at 1,000 yards.
- Bullet drop is not linear. It accelerates after 200–300 yards depending on caliber, BC, and velocity.
- Temperature, altitude, and barometric pressure all change your effective zero, especially past 300 yards.
- Different loads in the same caliber (e.g., 55gr vs 77gr 5.56; 147gr vs 175gr .308) can shift POI inches at 100 yards.
- Elevation above sea level changes drag, which changes how your zero “feels” in real terrain.
- LPVOs are not red dots. Turret values, magnification, parallax, and reticle geometry all play into your zero.
This masterclass builds on these facts instead of ignoring them.
Why the HSS DMR M-Reticle Changes How You Zero
- Traditional crosshairs are simple, but they obscure fine targets and give you almost no ranging information.
- Chevron tips are fast but block out small heads, distant hands, or tight window exposures when precision matters.
- Horseshoes and circles are fast on silhouettes but hide windows, HVAC units, and narrow geometry you need to read.
- Dots bloom at higher brightness and cover the exact point you are trying to confirm at distance.
- The M-Reticle uses an open, non-occlusive vertex gap and symmetrical legs to funnel attention into a small, high-contrast corridor instead of covering it.
- W24 (24″ width), H36 (36″ structural ruler), CH5 (sedan height), and SUV6 (SUV/truck height) turn your LPVO into a visual measuring system instead of a simple “crosshair with decorations.”
- Because the reticle is First Focal Plane, all of that geometry stays honest at 1×, 4×, 6×, and 10× — which means your zero and your holds stay consistent with your actual field of view.
Smart Zero AI and the Ballistics Calculator give you the numbers. The M-Reticle gives you a way to see those numbers in real streets, fields, and vehicle problems.
1. Why LPVO Zero Choice Matters More Than Ever
With an LPVO, your zero is not just where the bullet crosses the line of sight. It is the anchor point for how you think about distance across your entire magnification range.
On a modern AR-15 or AR-10 with an HSS DMR LPVO, your optic has to:
- Handle 0–50 yards inside structures and around vehicles
- Manage 50–300 yards in streets, parking lots, and open property lines
- Stay honest at 300–800 yards where drop, wind, and accountability become serious
Choose the wrong zero and everything downstream is harder:
- Holds feel random instead of predictable
- Wind calls are harder because your vertical is already off
- PID at distance is stressful because you do not trust your impacts
Choose the right zero, and your LPVO feels like a geared transmission: 1×, 4×, 6×, and 10× each have a predictable job, and the M-Reticle tells you what your bullet is doing at each band.
2. Zeroing Basics for LPVOs (Not Just Red Dots)
Red-dot zeroing articles treat the optic as a point that floats over the bore. LPVOs are different. They introduce:
- Turret values (0.1 MIL or 0.25 MOA clicks)
- Magnification and how wobble looks at 10× vs 1×
- Reticle geometry and stadia alignment with your bullet path
- Parallax considerations, especially at close distance with high magnification
Zeroing an HSS DMR LPVO is about aligning three things:
- The rifle and ammunition (caliber, MV, BC, barrel length)
- The environment (elevation, temperature, density altitude)
- The reticle and optic (M-Reticle geometry and magnification stages)
Smart Zero and the Ballistics Calculator bring those together into one data-backed recommendation instead of leaving you to guess.
3. The Three Main Zero Options: 50/200, 36Y, and 100Y
Serious doctrine and real ballistic data tend to center around three primary zero choices:
50/200 Zero
- Bullet crosses line of sight around 50 yards and again near 200 yards (caliber and ammo dependent).
- Provides a relatively flat trajectory out to 200–225 yards for 5.56 carbines.
- Excellent for general-purpose AR-15 use in urban and suburban geometry.
36-Yard Zero
- Historically used in some military contexts for 20″ rifles and specific load profiles.
- Provides a second intersection farther out (often beyond 300 yards).
- Can be useful, but is highly load and barrel-length specific and often misunderstood on shorter AR-15s.
100-Yard Zero
- Simple to understand and document: point-of-aim / point-of-impact at 100.
- Preferred for precision-oriented setups, especially AR-10 / .308 battle rifles and DMRs.
- Makes it easy to track vertical displacement in exact MIL/MOA at distance.
Any of these can be valid. The right choice depends on:
- Platform (AR-15 vs AR-10)
- Barrel length (10.3″, 11.5″, 14.5″, 16″, 18″, 20″)
- Ammo (light, medium, or heavy-for-caliber bullets)
- Role (home defense, patrol rifle, rural carbine, overwatch rifle)
- Typical engagement distances in your environment
Smart Zero exists to stop guessing and make that choice with your actual data.
4. Smart Zero — Empowered by SWAT Optics AI™
Smart Zero — Empowered by SWAT Optics AI™ is a decision engine that analyzes your rifle, your environment, your ammunition, and your expected engagement distances to recommend an optimal zero and the data that supports it.
Instead of “I heard 50/200 is good,” you get:
- A zero suggestion grounded in your barrel length and muzzle velocity
- Trajectory and drop data based on G1 or G7 ballistic coefficients
- Adjustments for your elevation and environmental inputs
- Comparisons across 5.56 vs .308, light vs heavy loads
- Clear guidance for your expected engagement range bands
Smart Zero Inputs
You tell Smart Zero how your rifle is actually configured and where you expect to fight:
- Caliber (e.g., 5.56 NATO, .223 Wylde, .308 Win / 7.62×51)
- Barrel length (e.g., 10.3″, 11.5″, 14.5″, 16″, 18″, 20″)
- Muzzle velocity (chronograph or manufacturer estimate)
- Bullet type & weight (e.g., 55gr FMJ, 77gr OTM, 147gr FMJ, 168gr/175gr BTHP)
- G1 or G7 ballistic coefficient for your specific load
- Elevation / approximate density altitude for your primary environment
- Estimated engagement ranges (for example, 0–300, 0–500, or 200–800 yards)
- Preferred zero family (50/200, 36Y, 100Y) if you have one, or “Let Smart Zero pick”
Smart Zero Outputs
Based on those inputs, Smart Zero — Empowered by SWAT Optics AI™ can provide, for each configuration:
- Recommended zero distance (e.g., “Optimized 50/200-style zero at 51 yards” or “Best 100Y zero given your engagement band”)
- Vertical trajectory curve from muzzle to 800+ yards
- Maximum point blank range within a defined vital zone (e.g., ±3″)
- Key hold values at 200, 300, 400, 500, 600, and 800 yards
- Comparisons between zero choices so you can visually see how 50/200 vs 100Y perform with your exact data
The result is simple: your zero is no longer a rumor. It is the outcome of an AI-assisted optimization based on your rifle, your environment, and your mission band.
5. Ballistics Calculator & Tactical Simulator Workflow
Smart Zero is one part of the system. The HSS DMR Ballistics Calculator & Tactical Simulator lets you visualize how that zero behaves with your reticle and holds.
Step-by-Step Workflow
-
Open the HSS DMR Ballistics Calculator & Tactical Simulator.
https://swatoptics.com/pages/swat-optics-hss-dmr-ballistics-calculator-and-tactical-simulator -
Select your platform.
AR-15 / 5.56 or AR-10 / .308, plus the specific HSS DMR LPVO you are running. -
Enter your exact ammunition data.
Bullet weight, BC (G1 or G7), muzzle velocity, and barrel length. -
Apply your Smart Zero AI recommendation.
Input the recommended zero distance from Smart Zero and generate a full trajectory table. -
Review your drop and wind at each key distance.
100, 200, 300, 400, 500, 600, and 800 yards depending on platform and role. -
Map those values into M-Reticle geometry.
Translate key distances into holds you will tie to W24, H36, CH5, and SUV6 bands. -
Print or screenshot your DOPE.
Keep it in your logbook, on your phone, or on a stock card as you run live-fire confirmation.
The calculator validates the Smart Zero recommendation and gives you the real numbers that your M-Reticle will express visually.
6. Building a Zero for AR-15 (5.56) with Smart Zero AI
For most AR-15 users, the rifle operates as a 0–300 yard gun with the ability to stretch to 400–500 yards when needed. That points strongly toward 50/200 or 100Y zeros depending on role.
General-Purpose AR-15 Carbine (Patrol / Home Defense / Rural Blend)
- Preferred zeros: 50/200 or Smart Zero-optimized variant
- Strength: Less vertical error from 0–225 yards, intuitive holds at 300–400
- Smart Zero job: Fine-tune the exact zero distance and hold table for your 55–77gr load, barrel, and environment
AR-15 as a Micro DMR (Heavier Bullets, More 400+ Yard Work)
- Preferred zeros: 100Y or Smart Zero-optimized 100-yard solution
- Strength: Simplified long-range math, excellent for detailed hold tables and training
- Smart Zero job: Optimize the curve so that your mid-range vertical error is minimized where you actually shoot
Smart Zero Workflow for AR-15
- Select 5.56 or .223 Wylde and your barrel length (e.g., 11.5″, 14.5″, 16″).
- Input your muzzle velocity and BC for your chosen load (55gr, 62gr, 69gr, 75–77gr etc.).
- Set your expected engagement band (e.g., 0–300 yards for urban, 0–500 yards for mixed).
- Let Smart Zero recommend a zero within the 50/200 or 100Y family that minimizes error across that band.
- Push that zero into the Ballistics Calculator, verify, and export your DOPE.
From there, the M-Reticle lets you see where those holds live in real structure: windows, doors, vehicles, backpacks, and H36 vertical geometry.
7. Building a Zero for AR-10 (.308) with Smart Zero AI
The AR-10 is different. It throws heavier bullets, carries more energy, and is more often used in 300–800 yard problem sets. Zeroing standards must be tighter and more accountable.
.308 Battle Rifle / DMR Roles
- Preferred zero: 100Y (or Smart Zero-optimized zero near that point)
- Why: Easier to track vertical shift at 300–800 yards in clean MIL/MOA units
- Smart Zero job: Balance mid-range and long-range error so that your 300–600 yard zone is predictable and honest
Smart Zero Workflow for AR-10
- Select .308 Win / 7.62×51 and your barrel length (e.g., 16″, 18″, 20″).
- Enter your muzzle velocity and BC for your specific load (147gr, 155gr, 168gr, 175gr, etc.).
- Set your expected engagement band (e.g., 100–600 or 200–800 yards).
- Let Smart Zero recommend an optimized 100-yard-class zero that keeps impacts within your defined vertical envelope (e.g., ±3″) over the most critical distances.
- Feed that zero into the Ballistics Calculator to generate your .308 drop table and cross-check the Smart Zero output.
Once this is done, your .308 LPVO no longer feels like a “big AR-15.” It behaves like a mapped system with precise holds that tie directly into your reticle geometry and real-world vehicles, windows, and exposure.
8. Tying Your Zero to the M-Reticle Geometry (W24, H36, CH5, SUV6)
A zero is just a number until it is expressed through your glass. The HSS DMR M-Reticle is built so your Smart Zero and ballistic data have physical anchors in real terrain.
W24 — 24″ Structural Width
- Represents a 24-inch horizontal span inside the reticle.
- Maps to common window widths, gear clusters, and structural segments.
- Core heuristic:
- Full W24 ≈ 200-yard band
- Half W24 (~12″) ≈ 400-yard band
- Once your zero and DOPE are set, you can associate:
- “Full W24 at 4×” with your 200-yard holds.
- “Half W24 (backpack width) at 6×” with your 400-yard holds.
H36 — 36″ Structural Ruler for Kneeling Shooters & Vehicle Hoods
H36 is a 36-inch vertical ruler. In your system it is not a generic torso marker. It is used for:
- Reading kneeling shooter height at distance (≈ 36–40″ ground to shoulder/helmet)
- Understanding vehicle hood height when someone is using the engine block for cover
As range increases, kneeling figures and hood lines compress against H36. Combined with your Smart Zero DOPE, H36 tells you:
- Whether you are in a 200, 300, 400, or extended band.
- How much of the person is actually exposed above the hood line.
- Which hold corresponds to that band with your chosen zero.
CH5 & SUV6 — Vehicle Stadia
- CH5 — ~60″ sedan roofline reference
- SUV6 — ~72″ SUV / truck roofline reference
Once your zero and ballistic data are confirmed, CH5 and SUV6 help you:
- Classify vehicle type at distance (sedan vs SUV/truck).
- Evaluate how much head and shoulder exposure exists above a hood or trunk.
- Lock a vehicle into your W24/H36 geometry to support a band call and hold choice.
Zero + Smart Zero + Ballistics Calculator tells you what the bullet will do. The M-Reticle tells you where to use that data when a real car, real window, or real kneeling posture shows up in your glass.
9. Zeroing Drills That Make Data Real
Paper zeroing once a year is not enough. You need patterned reps that connect Smart Zero and ballistic data to real reticle pictures.
Drill 1 — 50-Yard Confirmation (AR-15, 50/200 Family)
- Apply the Smart Zero-recommended 50/200-style zero for your AR-15.
- Shoot a tight 5-round group at 50 yards at 4×.
- Confirm that the POI matches your expected elevation offset from Smart Zero.
- Repeat at 200 yards and validate both matches.
Drill 2 — 100-Yard Precision Check (AR-10, 100Y Zero)
- Apply the Smart Zero-recommended 100-yard zero for your .308 AR-10.
- Shoot careful groups at 100 yards at 6–8×, focusing on clean trigger and follow-through.
- Confirm minimal vertical error against your DOPE.
- Move to 300 and 400 yards and check your vertical holds from the Ballistics Calculator.
Drill 3 — W24 and Backpack Banding
- Measure a real backpack (often 10–12″ wide).
- Hang it against a simple background at a known distance.
- At 4× and 6×, read how it fills W24 and call “band” out loud (200, 300, 400).
- Apply the corresponding hold from your Smart Zero DOPE and verify on steel or paper.
Drill 4 — H36 and Vehicle Hood Geometry
- Use a real vehicle in a safe training environment.
- At known distances, read hood height and roofline against H36, CH5, and SUV6.
- Visualize kneeling head/shoulder exposure above the hood.
- Associate each apparent exposure with your band call and hold table.
Run these drills once per month and your zero stops being a theoretical number. It becomes a trained pattern attached to specific reticle pictures and specific holds.
10. Common Zeroing Mistakes with LPVOs
- Copying someone else’s zero without matching their ammo, barrel length, or environment.
- Zeroing at 25 yards and assuming it will “work out” at 200–300 yards.
- Ignoring elevation and temperature when building long-range holds.
- Changing loads (e.g., 55gr range ammo to 77gr duty ammo) without re-running Smart Zero and the Ballistics Calculator.
- Zeroing at max power only and never confirming holds across the LPVO staging bands (1×, 4×, 6×, 10×).
- Failing to connect DOPE to reticle geometry — numbers in a notebook but no pattern on glass.
Smart Zero and the HSS DMR Ballistics Calculator are designed to eliminate these mistakes by forcing your zero to be data-driven and repeatable, not anecdotal.
11. Summary & Final Recommendations
A modern LPVO is not just a scope. On an AR-15 or AR-10, it is the front end of a fire-control system that includes your ammunition, your environment, and your decision-making under stress.
When you combine:
- Smart Zero — Empowered by SWAT Optics AI™ for optimized zero choice
- The HSS DMR Ballistics Calculator & Tactical Simulator for true trajectory data
- The HSS DMR M-Reticle for geometry-based ranging and accountability
- A consistent training block for confirmation and refinement
…your LPVO stops being “glass with a pattern” and becomes a
If your rifle matters, your zero should too.